Angkor Photography Tips-Camera, Lens, Tripod, Scanner Reviews 2009

Indiana Jones just needed a whip and a machete when he headed to the jungle in search of lost temples. As a modern explorer, I use a digital set of tools to bring my Khmer treasures back from Cambodia. The truth is, I learn more about the devata (images of Cambodia’s sacred women) reviewing high resolution photos at my desk in Florida than I ever do in the field. The beauty and the complexity of Angkor Wat and other Khmer monuments is overwhelming…better to explore each image and view at length at my desk.
I took all the photos in my Khmer temple photo gallery with the equipment below.
But first a disclaimer…my skill as a photographer is pretty much limited to Point…and Shoot…I count on technology to do the rest! If you want to see what truly gifted photographers do in Cambodia, please visit the exceptional online photo galleries of Jaro Poncar and John McDermott for images of Angkor Wat and other Khmer temples. For Cambodian dance and performance arts visit the galleries of photographers Anders Jiras and Andrew Page. And don’t miss Gary Ng’s beautiful shots of an Angkor sunrise on his first visit to Cambodia.
Camera Review angkor photography tips
Pentax K20D 14.6MP Digital SLR Camera with Shake Reduction
 I bought my K20D to do research photography in rough environments in Cambodia, Thailand and Laos. I’m not a technical equipment expert but I have plenty of experience using cameras as a tool of my trade. This review relates a few tips and personal impressions about this terrific camera.
I actually bought a K10D in January 2007 for a series of research trips in Southeast Asia. I took about 15,000 trouble-free photos with that camera when it was, unfortunately, destroyed in an accident (a fire, incidentally, and I think it would have survived just about anything else).
In November 2008 I bought a K20D as a replacement. I bought my K10D with the standard lens. This time I bought the body and lens separately, which gave me a much better camera for my application. I decided on a Sigma 18-50mm f/2.8 EX DC SLD ELD Aspherical Macro Lens for Pentax and Samsung Digital SLR Cameras, which I’ll review separately.
After my experience with the K10D it was a no-brainer to buy the K20D. Features are similar so there was no learning curve, and all my accessories (Pentax BG2 Battery Grip, Tamron AF 70-300mm f/4.0-5.6 Di LD Macro Zoom Lens, Pentax AF540FGZ Flash were compatible. The K20D is an even better camera with higher image resolution, color enhancement and (I think) improved image stabilization.
Battery life is outstanding – Up to 600 shots on one charge, including many with fill in flash and checking each shot in the LCD screen as it’s taken. With an extra battery this camera far exceeds my endurance for a day of shooting.
Two boy scout tips will make life better (or at least more relaxed) with this camera:
1. Buy an extra battery and charger – The uncommon format used in this camera makes these items very difficult to find in local camera stores (impossible to find where I go). No battery or no charger = no pix. I got this inexpensive kit with 2 Replacement Pentax D-LI50 Batteries and Mini Battery Charger for the K10D & K20D Digital SLR Cameras. Good insurance.
2. Take an extra USB cable to download your pix to computer. Like the batteries, the tiny D-shell connection to the K20D body is not a common size. On one trip when I lost this I ended up buying a flashcard USB reader because the cable was nowhere to be found…at least in Cambodia.
November 2008 I shot 7,000 trouble free photos in 9 days. High heat, high humidity and occasional jolts (oops) never slow this rugged piece of equipment down. A great camera that is easy to use in difficult shooting situations.
Lens Review
Sigma 18-50mm f/2.8 Macro Lens for Pentax
 In 2007 I bought a Pentax K10D with the standard factory 18-55mm f/3.5-5.6 Lens. In 2008 I upgraded to the Pentax K20D 14.6MP Digital SLR Camera with Shake Reduction (Body Only) and chose to buy this lens separately. A great decision that gave me much better results.
I was worried about losing the extra 5mm of zoom but the lower light f2.8 capability absolutely made this lens the way to go. I’m a research photographer doing work in Khmer temples in Cambodia. My light conditions constantly range from “too much” to “not enough”. This lens performed perfectly in all conditions.
Mechanical motions are smooth and didn’t change in a recent 9 day temple shoot of 7,000 photos in 9 days. The lens feels solid and performed reliably.
I drove myself nuts researching dozens of lenses before deciding on this one. It seemed to offer the best ratio between performance and cost. I am delighted with my choice.
Monopod Review
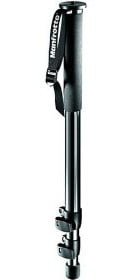
 Manfrotto 681B Professional Aluminum Monopod (Black)
Manfrotto 234RC Monopod Head Quick Release
Taking this on my December 2009 trip to Banteay Chhmar, Angkor Wat and the temples of Siem Reap and will report back soon. Anders Jiras recommended using a monopod when I met him in Phnom Penh in December 2009 — I’ve been looking forward to heading back with one ever since.
In Preah Khan, for example, it was painful to return home only to find less than crisp images of my Khmer goddesses. And this time, a new trick…one can use a monopod to easily elevate your camera another 6′ in the air…so my 6′ + 2′ for my arms + the 6′ monopod and the camera on a timer…wait until you see my next pix of the Hall of Dancers and the Nagini of Preah Khan! (-:
Tripod Review
Manfrotto 715SHB Digi Tripod
I’ve switched from a tripod to the monopod above for easier access to tight locations.
Scanner Review
Canon CanoScan 8800F Color Film/Negative/Photo Scanner
 If you need a general all around scanner, this baby is for you. Great features, very versatile and a super price. Hey, an *incredible* price for the features! One immediate benefit is that this scans with instant-on LED light…no waiting a couple minutes for it to warm up like other scanners.
There are plenty of other reviews on Amazon from people smarter than me that will give you loads of technical info about all the features.
But are you looking to scan film?
Did you just have the great idea…”Hey! I’m going to take all my old film and digitize it so I can burn a DVD/post it on my blog/etc.”???
Me, too.
Well buckle up, my friend, it’s going to be a bumpy ride. If you want to digitize that giant pile of 35mm negatives you have in your drawer let me ask YOU a four questions…
- Do you work at home?
- Do you have a *lot* of free time on your hands?
- Do you run 2 computers at the same time?
- Do you have ADD?
If you answered yes, then your analogue past life is about to go glamorously digital. See…here’s the thing…scanning negatives is s……..l………o……….w. And tedious. And low quality
NOTE: I have been taken to task for this last comment…apparently some folks think scans from their 35mm images are better than what they get in this digital age. Hundreds of slides and negatives later, I disagree.
My experience (x 1,000) is that my 35mm negatives from the 70’s and 80’s are pretty sad compared to what you shot yesterday on your digital pocket camera. Sure, I shot plenty of grainy pix in poor light with ASA 200-400 film, but I also shot plenty of 100 speed. I now use a Pentax K20D 14.6MP Digital SLR Camera saving images at 7-9 megs. I’ve found nothing from a 35mm slide or negative that holds a candle to that.
Once I realized that my antique film medium itself is deficient, I stopped indulging myself in the fantasy that scanning at 9600dpi (extrapolated) would make a bit of difference. My slides and film just wouldn’t stand up to that.
I ended up scanning at 1200 dpi. It takes 2 minutes per frame.
If you’re lucky, you’ll have 6 frame strips and you can scan two strips at a time. That’s 24 minutes. If you’re not lucky (i.e. most of the time) the film strips are cut to 4 images. Two of those means 16 minutes. Then add the time to change strips.
You cannot use your computer for ANYTHING else while scanning. Don’t even think about it! So you will have to change film strips every 16 minutes…or every 24 minutes. Take your pick. So get ready to be interrupted every 16-24 minutes until you’ve relived your life.
Got a 36 exposure roll to digitize? Have over an hour to kill with 3-5 interruptions? Don’t need your computer for anything else (or have a spare computer humming)?
Then you’re ready for the adventure of negative film or slide scanning.
I’m not complaining, just reporting the facts. The alternative is to use a commercial service and pay around 50 cents per image. And if you think $18 is steep for the one *decent* frame off that roll of your trip to Thailand in 1991…I agree.
Conclusion – This scanner is as good as it gets…in this price range. Have fun!(-:
Article by Kent Davis
angkor photography tips

